Showing posts with label Cooking. Show all posts

Thursday, November 8, 2012

Pumpkin Cobbler

A friend requested this recipe recently.....thought I'd post it here in an effort to keep this blog somewhat sweet! ;)

I originally got it years ago from Taste of Home magazine, a magazine that played a key role in teaching me how to cook. :)  It's real name is Magic Pumpkin Buckle, but my kids could never remember that name and would ask me to make "that pumpkin stuff". ;)  When I would tell them the name, it would lead to an entire conversation on what a strange name they thought it was and why in world it was named that......they liked this name better, so it stuck.

Whatever you call it, you'll also be calling it YUMMY, because it is (we like it with Cool Whip on top)!  It's become a dessert I'm expected to make every fall.....and it's super easy ~ as easy as pie!  Actually, if you make your own crust when you make pie, you'll find this easier. ;)

So, here ya go, Arlene.....this one's for you!  And anyone else who wants it, too. :)

Pumpkin Cobbler
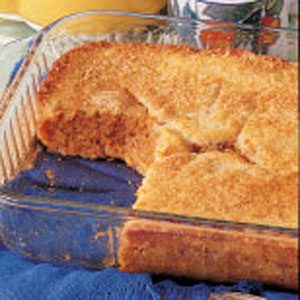

Magic Pumpkin Buckle Recipe

(picture from Taste of Home magazine)

Ingredients

  • 1/2 cup butter, melted
  • 1 cup all-purpose flour
  • 1 cup sugar
  • 4 teaspoons baking powder
  • 1/2 teaspoon salt
  • 1 cup milk
  • 1 teaspoon vanilla extract
  • FILLING:
  • 3 cups canned pumpkin
  • 1 cup evaporated milk
  • 2 eggs
  • 1 cup sugar
  • 1/2 cup packed brown sugar
  • 1 tablespoon all-purpose flour
  • 1 teaspoon ground cinnamon
  • 1/2 teaspoon salt
  • 1/4 teaspoon each ground ginger, cloves and nutmeg
  • TOPPING:
  • 1 tablespoon butter
  • 2 tablespoons sugar

Directions


  • Pour butter into a 13-in. x 9-in. baking dish; set aside. In a large bowl, combine the flour, sugar, baking powder and salt. Stir in milk and vanilla until smooth. Pour into prepared pan.
  • In a large bowl, beat the pumpkin, milk and eggs. Combine the remaining filling ingredients; add to pumpkin mixture. Pour over crust mixture (do not stir). Dot with butter and sprinkle with sugar.
  • Bake at 350° for 55-60 minutes or until a knife inserted near the center comes out clean and the top is golden brown. Yield: 12 servings

Thursday, October 27, 2011

Tomato Basil Soup


  • I got this recipe many moons ago from Light & Tasty, a magazine put out by Taste of Home.  It's a perfect accompaniment to the last recipe I posted, Chicken Pesto Paninis.  It's yummy just the way it is, but I sometimes add some freshly pressed garlic to it, because we love our garlic and it's good for you!  I'm thinking about making it this weekend, in addition to some other goodies for one of the few football games I actually care to watch.  Go Dawgs!! =)
  • Tomato Basil Soup

  • Tomato Basil Soup Recipe
photo & recipe by: Taste of Home


  • 4 medium carrots, finely chopped
  • 1 large onion, finely chopped
  • 1/4 cup butter, cubed
  • 1 can (49 ounces) reduced-sodium chicken broth or 6 cups vegetable broth, divided
  • 1 can (29 ounces) tomato puree
  • 5 teaspoons dried basil
  • 1-1/2 teaspoons sugar
  • 1/2 teaspoon salt
  • 1/2 teaspoon white pepper
  • 1 can (12 ounces) fat-free evaporated milk


In a Dutch oven, cook carrots and onion in butter over medium-low heat for 30 minutes or until vegetables are tender, stirring occasionally. Remove from the heat and cool slightly.
    In a blender, place 1/2 broth and the cooled vegetables; cover and process until blended. Return to the Dutch oven. Stir in the tomato puree, basil sugar, salt, pepper and remaining broth. 
    Bring to a boil. Reduce heat; simmer, uncovered, for 30 minutes. Reduce heat to low. Gradually stir in evaporated milk; heat through (do not boil). Yield: 6 servings (2-1/4 quarts). 


Thursday, October 6, 2011

Chicken Pesto Grilled Sandwiches / Paninis

A while back, I entered a recipe contest {I used to have time to do that sort of thing ; ) }, and this was my contribution based on a specific list of ingredients.  Super yummilicious served with a bowl of  homemade Tomato Basil Soup ( <----- check back next week)!


I make these on a large electric T-Fal griddle so that I can make the whole family's meal at once. Instructions are given based on cooking in this manner, but these could easily be made on a grill or Panini grill as well. The pesto recipe is a little thicker than I normally make it to prevent the oil inthe pesto from saturating the bread before the sandwich is done. Cook and prep time include time for making pesto and marinade, but do not include the time needed to marinate the chicken, so plan ahead! You'll be glad you did! :)


 **We really like this sandwich, but not the Nutritional Facts! If you would like to lighten it up a bit, instuctions are at the bottom of the page......you could also omit the chicken and do all veggies if you want (but the chicken is delish).

Chicken Pesto Grilled Sandwiches/Paninis-Original & Lighter

Chicken Pesto Grilled Sandwiches/Paninis-Original & Lighter. Photo by Sweet Diva

Pesto:


2 1/2 cups spinach leaves, fresh
1 cup asiago cheese, grated
1/2 cup pine nuts, toasted
2 garlic cloves, large, peeled and cut in half
1/4 teaspoon salt
1/4 teaspoon pepper
1/2 cup olive oil


Chicken Marinade:


1/4 cup pesto sauce
1/4 teaspoon salt, opt.
1/4 teaspoon pepper
1 lb skinless chicken breast halves, cut lengthwise into 1/4-inch s thick strips


Other Ingredients:


2 ounces sun-dried tomatoes, julienne cut (or roasted red peppers)
1/2 cup water1/4 cup olive oil, divided
6 ounces baby portabella mushrooms, sliced
1 loaf Italian bread10 ounces gouda cheese, thinly sliced
4 tablespoons butter, divided

Directions:

For pesto, combine first six ingredients in a food processor.
Process until finely chopped; gradually pour in olive oil and process until all ingredients are thoroughly combined.For chicken marinade, combine all marinade ingredients (using 1/4 cup of the pesto you just made and reserving remaining pesto for later use).

Place marinade and chicken in a bowl or zip-top plastic bag. Make sure chicken is thoroughly covered; refrigerate 6-8 hours.  Remove chicken from marinade; discard marinade.

In a nonstick skillet, cook chicken in 2 Tablespoons oil over med-high heat, about 5 - 7 minutes. Remove chicken and divide into 6 equal portions; set aside.  Drain tomatoes.   In same skillet that you cooked the chicken in, saute mushrooms and sun-dried tomatoes in remaining 2 tablespoons oil  until mushrooms are tender and liquid is absorbed; divide into 6 equal portions; set aside.

Separate thinly sliced Gouda into 6 equal portions.  Cut 12 slices, 1/2" thick, from Italian bread loaf.For each sandwich, do the following:. On one slice of bread, layer chicken strips, mushroon/tomato mixture, and then Gouda slices. Place remaining bread slice, pesto side down on top of cheese. Spread approximately 1 teaspoon butter on top bread slice.  Place, buttered side down, on preheated griddle or grill.  With a spatula, press down on the sandwich - just to kind of "smoosh" it together, and while it is cooking, spread approximately 1 teaspoon butter on top slice of bread. Grill approximately 5 minutes, flip and grill approximately 3-5 minutes more or until cheese is melted and bread is golden brown and crispy.Repeat for remaining sandwiches.

***Lighter version***.

For pesto sauce, substitute 1/2 cup chicken or vegetable broth for the olive oil and omit the salt (if using low-sodium chicken or vegetable broth, you may not want to omit the salt) and reduce pine nuts to 1/3 cup or omit altogether (if you want to go even lighter).Proceed with recipe as instructed.Reduce Gouda to 6-8 ounces (depending on your preference for cheesiness), thinly slice and proceed with recipe instructions.Omit the butter that is spread on top of the bread before grilling and instead use a lighter spread - I use Smart Balance Light Buttery Spread w/ Flax, or I Can't Believe It's Not Butter Spray (No fat or calories in this one).Depending on which and how many of the suggested changes you make, you could cut the fat and calories significantly and still have a tasty panini. :).


Thursday, September 29, 2011

Beefy Calzones

I have a  recipe for you....because it's on my menu of things to make within the next week or so, and apparently there's a few of you out there who have missed my regular recipe posting! =)  Roast is on sale this week, so I'll be stocking up and roasting for future recipes like this one......

These calzones are always a hit with my family. =)  I make my own pizza dough and double the sauce to make sure we have plenty for dipping. I also frequently toss in 1 cup of frozen green pepper/ red pepper/ onion blend instead of the onion and bell pepper called for. I have made them with ground beef, but our *favorite* way is with leftover roast beef. Either way, they're good! These freeze well also.  Try them.  You'll like them.  If you don't, your kids will! ; )

Beefy Calzones

Beefy Calzones. Photo by Sweet Diva


Ingredients:

    • 1 lb ground beef or 1 lb beef roast 
    • 1/4 cup onions, finely chopped
    • 1/4 cup bell peppers, finely chopped
    • 2 garlic cloves, minced
    • 1 (15 ounce) cans tomato sauce
    • 1/2 cup A-1 Steak Sauce
    • 1 teaspoon Italian seasoning
    • 2 (11 ounce) packages refrigerated pizza dough
    • 2 cups mozzarella cheese, shredded ( 8 oz.)

Directions:


  1. In a large skillet, over medium-high heat, cook beef, onion, pepper and garlic until beef is no longer pink, stirring to break up meat;drain.
  2. Keep warm.
  3. In small skillet, over medium-high heat, heat tomato sauce, steak sauce & Italian seasoning to a boil.
  4. Reduce heat to low; simmer 5 minutes or until slightly thickened.
  5. Stir 1 cup tomato sauce mixture into beef mixture; set aside.
  6. Keep remaining tomato sauce mixture warm. Unroll pizza dough from 1 package; divide into 4 equal pieces.
  7. Roll each piece into 6 square; spoon 1/3 cup reserved beef mixture onto center of each square.
  8. Top with ¼ cup cheese.
  9. Fold dough over to form triangle.
  10. Press edges together, sealing well with tines of a fork.

  1. Repeat with remaining dough, filling & cheese to make a total of 8 calzones.
  2. Bake at 400* for 20 minutes or until golden brown.
  3. Serve with warm sauce. Garnish as desired. Serves 8.
     Notice my new banner?  Come back next Thursday for another recipe.....I've put myself on schedule! =)
Photobucket

Monday, June 20, 2011

Cheeseburger Pizza ~ Kid-friendly Recipes ~ Fun in the Summer Sun Link-Up

Welcome to the 2nd week of our Fun in the Summer Fun event!  Each Monday until September 7th,  Mama to 4 Blessings along with:

Adventures of Mommydom,

Sweet Diva,
 Harvest Moon By Hand,
and Sweet Phenomena

 will be hosting Fun in the Summer Fun link up events.
Here's the line up:
The 1st Monday of each month: link up your "Kid friendly summer activities"
The 2nd Monday of each month: link up your "Kid friendly summer crafts"
The 3rd Monday of each month: link up your "Kid friendly summer recipes"
The 4th Monday of each month: link up your "How to stay cool in the summer heat"

Cheeseburger Pizza:
Sausage Cheeseburger Pizza (Cooking for Kids - Southern Living at Home Ckbk)
*made this way, it tastes much like a Krystal

1 lb. Bob Evans Original Recipe Roll Sausage (or lean ground beef or turkey)
1 (12 inch) prepared pizza shell
1/2 cup yellow mustard
2 cups (8 oz.) shredded mozzarella cheese
1/2 cup chopped onion
15 dill pickle slices
3/4 cup (3oz.) shredded cheddar cheese

Preheat oven to 425. Crumble and cook sausage in medium skillet until browned; drain well on paper towels. Place pizza shell on lightly greased 12" pizza pan on baking sheet. Spread mustard over shell; top with mozzarella cheese, sausage and onion. Place pickle slices evely on top; sprinkle with cheddar cheese. Bake 12 min. or until crust is cooked through and cheese is bubbly. Cut into thin wedges and serve hot. Refrigerate leftovers.

Makes about 8 servings.

Altered Version(pictured)

I ususally don't use the mozzarella when making it this way and use 8 oz. of cheddar cheese instead. Follow above instructions, using your choice of meat. I chop 1/2 cup onion and cook it with the meat because the kids like it better when the onions are softer - I like it either way. On top of crust (we usually make our own instead of the prepared), spread a layer of ketchup (maybe 1/3- 1/2 cup); I have put it on the pizza sometimes, and other times have served ketchup on the side - the family likes it either way and I haven't decided yet which way I like it best, then a layer of mustard. Add cooked meat, pickles, about 1/2 - 3/4 cup chopped fresh spinach and approx. one tomato, thinly sliced. Top with shredded cheddar cheese. Bake as directed above.

Pizza Dough:
Just in case you want to try making your own, too!  Makes enough for 2 pizzas; we double the above recipe because 1 pizza isn't enough for our family. ; )

1/2 Tbsp. dry yeast
1/8 c. warm water
1 1/4 cup milk
1/4 cup sugar
3/4 tsp. salt
Approx. 5 1/2 cups flour
1 egg, slightly beaten
1/4 cup oil

Dissolve yeast in warm water.  Heat milk to warm (110-115 degrees).  Add sugar, salt, and yeast to milk.  Gradually mix in 2 cups flour.  Add beaten egg and oil.  Mix well, then add remaining flour, until you have a soft dough, kneading well.  Cover with a damp cloth and let rise until doubled.  Punch dough down and let rest for 10 min.  Divide in half and spread each half on a greased and floured 12 in. pizza pan.  Add favorite toppings.  Bake at 400* for 15 minutes; add shredded cheese and bake 5 min more until cheese melts.

Confession:  this was on our menu for last week, but these photos are about 2 yrs. old.  We had a crazy busy week and it got pushed to this week's menu instead.  Bad blogger ~ but look how cute my Ashlyn was! ; )  This is one of her favorite recipes!

rolling out homemade pizza dough:


browning the meat:
 

about to put it in the oven: 

 yummy =)


Photobucket

Tuesday, May 10, 2011

Cookin' Up Something Cute.....

I  made these ♥super sweet♥ aprons a few weeks ago to donate to a silent auction.  I thought I had already posted about them, but as I scrolled through my past posts I realized what a neglectful blogger I have been! = (  I think I posted the pics on Facebook and then my mind just checked them off as "done".  Sometimes my mind and reality do not agree!!  ; ) Going to try to catch up on posting most of my latest crafty endeavors this week......the ones I took pictures of, anyway (and the ones whose pictures weren't accidentally deleted)! 

For the Super Cute Female Assistant, I made this Girl's Toddler/Child Apron ~ because even when we're cooking, every girl should celebrate her own sense of style ;).....


This ♥sweet♥ little apron is constructed of a brown and blue floral print and accented with contrasting brown and blue polka dots straps, 3 rows of very ♥sweet♥ feminine ruffles, and an appliqued center flower.


Neck ties criss-cross in the back and loop through two side loops to tie at the waist. Straps are generously cut to make this apron fully adjustable.


Embroidery inside the appliqued center flower says: Super Cute Assistant =) but may be embroidered with the name of monogrammed initials of your choice.


For the little men out there, I also donated this Boy's Toddler/Child Apron ~ because who says boys can't cook....and when they do, they sure don't want to wear a girly-looking frock!

This ♥sweet♥ little apron is constructed of a blue denim with a plaid contrasting fabric, 3 front pockets. Inspired by my own train-loving little chef, it is embroidered with a very cool train design and chef's hat with the phrase "Master Chef in Training" ~ pun intended! ; )

The apron may also be embroidered with the name of monogrammed initials of your choice instead of the chosen phrase ~ or if you desire a different graphic ~ please contact me! I ♥ special requests and would love to customize one for you!! .


The apron ties behind the neck and also at the waist. Straps are generously cut to make this apron fully adjustable.

Sizes available are:

Size 4 ~ Chest 24", Waist 22", Height 42"
Size 6 ~ Chest 25", Waist 23", Height 46"
Size 8 ~ Chest 26 1/2", Waist 24", Height 50"
Size 10 ~ Chest 28", Waist 25", Height 54"
Size 12 ~ Chest 30", Waist 26", Height 58"


I had so much fun creating these................and have more in the works, so stay tuned! ; )


♥ ♥ ♥ ♥ ♥ ♥ ♥ ♥ ♥ ♥ ♥ ♥ ♥ ♥ ♥ ♥ ♥ ♥ ♥ ♥ ♥ ♥ ♥ ♥ ♥ ♥ ♥ ♥ ♥ ♥ ♥ ♥ ♥ ♥ ♥ ♥ ♥

And whatsoever ye do, in word or in deed, do all in the name of the Lord Jesus, giving thanks to God the Father through him. ~ Colossians 3:17

♥ ♥ ♥ ♥ ♥ ♥ ♥ ♥ ♥ ♥ ♥ ♥ ♥ ♥ ♥ ♥ ♥ ♥ ♥ ♥ ♥ ♥ ♥ ♥ ♥ ♥ ♥ ♥ ♥ ♥ ♥ ♥ ♥ ♥ ♥ ♥ ♥

Linking up with:

Get Your Craft On Tuesday
Photobuckethandmade projects

Friday, March 25, 2011

Quinoa Tabouleh - Recipe


Back when my life was my own (or, I thought it was - aka: before children), I was going to school  for Interior Design while working as a store manager for a local decorative fabric store.

One of my very ♥sweet♥ employees was an older lady named Mary Tringadjis, who kind of adopted me into her family and treated me as such ♥.  Mary introduced me to the wonderful, amazing flavors of Greek and Mediterranean food and made the most amazing Baklava I had ever tried, or have tried since.  I thought I didn't like baklava until I had hers ~ I am convinced no one could make it like she could!  When I was expecting my daughter, she would bring me all of my favorites on a regular basis. =)

While this isn't a recipe for Baklava, it is a Mediterranean recipe and every time I make it, I think of Mary and silently thank her for exposing me to what has now become my favorite Ethnic cuisine......and I sometimes close my eyes and imagine I am in the one place in the world I would go if I could:

Care to join me? ; )

Unfortunatley, I'm not there right now.  : ( 

But, I am starting a fruit and veggie fast today.  Because I am exhausted.  Really exhausted.  And don't feel well......and kind of tired of not feeling well.  Often when I get in this run-down rut, I find that fasting and praying helps get me back where I need to be.  So, that's what I'm going to do......and this recipe fits into my fast for lunch or dinner.  When I'm not fasting, I combine it with my homemade hummus and grilled portebello mushrooms and wrap it in a whole grain wrap.  Amazingly, wonderfully, healthfully delicious!!

Quinoa Tabouleh


Photo by Timeless Gourmet

 Prep Time: 10 mins Total Time: 30 mins Servings: 6-8

Ingredients :

1 cup quinoa
2 cups water
1 -2 medium tomatoes, cut into cubes
1 medium onions or 6 green onions, finely chopped
1 medium cucumbers, peeled and cut into cubes
1 small green peppers, seeded and cut into 1/2 inch cubes ( opt)
1 bunch parsley, finely chopped
1 cup fresh mint, Finely Chopped or 1 teaspoon dried mint
1/3 cup lemon juice
1/3 cup olive oil
4 garlic cloves, minced
1 teaspoon sea salt
pepper

Directions:

Put the quinoa in a wire strainer and thoroughly rinse with hot water to remove any bitter flavor.

In a medium saucepan, bring the water and quinoa to a boil over high heat.

Reduce the heat to low, cover, and simmer until the quinoa is tender and the water is absorbed, 10 to 12 minutes.

Let cool completely.

Stir the tomatoes, onion, cucumber and parsley into the quinoa.

In a small bowl, whisk together the lemon juice, oil, garlic and salt.

Pour over the quinoa and toss well.

Cover and refrigerate for at least 30 minutes before serving

Friday, March 11, 2011

Curried Chicken Lettuce Wraps

I am starving.  Really.  So hungry right now.  And I want to make this....but I don't have all  the ingredients.
Sigh. 

Seriously, this is one of my most-loved chicken salad recipes.  Eat it by itself, stuff it in a pita pocket, roll it in a tortilla....or, as the name and pic suggest ~ make a pretty and low-carb lettuce wrap! 

I sometimes try to make it just for myself.  You know, make a batch for a healthy and delicious lunch option that will last me a few days because it's so good I don't get tired of it.  But these beggars that live with me always have to stick their noses in my business! ; )

Turns out they love it, too.....so that batch that is supposed to last me a few days usually lasts ONE.  Ahhhh....the joys of family life!  Sharing is sometimes highly overrated.

Curried Chicken Lettuce Wraps

The pic doesn't do it justice........just trust me.  I like good food!

Ingredients :


1/2 cup sour cream (or reduced-fat sour cream)
1/4 cup mango chutney
1/4 cup mayonnaise (or light mayo) 
1 teaspoon curry powder
1 clove garlic, minced
1/4 teaspoon salt
1/2 cup celery, diced
1 apple, cored and chopped
1/4 cup red onions, diced
2 cups diced cooked chicken breasts
1/2 cup dried cranberries
12 lettuce leaves (I use leafy green - or serve on a bed of fresh spinach)
1/4 cup sliced almonds

Directions :

Mix first 11 ingredients together (sour cream to dried cranberries).

Put approximately 1/4 cup mixture on lettuce leaf and sprinkle with 1 tsp almonds.

Roll up and enjoy!