Showing posts with label Baking. Show all posts

Thursday, November 8, 2012

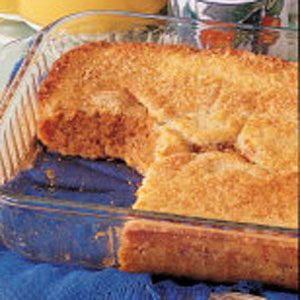
Pumpkin Cobbler

A friend requested this recipe recently.....thought I'd post it here in an effort to keep this blog somewhat sweet! ;)

I originally got it years ago from Taste of Home magazine, a magazine that played a key role in teaching me how to cook. :)  It's real name is Magic Pumpkin Buckle, but my kids could never remember that name and would ask me to make "that pumpkin stuff". ;)  When I would tell them the name, it would lead to an entire conversation on what a strange name they thought it was and why in world it was named that......they liked this name better, so it stuck.

Whatever you call it, you'll also be calling it YUMMY, because it is (we like it with Cool Whip on top)!  It's become a dessert I'm expected to make every fall.....and it's super easy ~ as easy as pie!  Actually, if you make your own crust when you make pie, you'll find this easier. ;)

So, here ya go, Arlene.....this one's for you!  And anyone else who wants it, too. :)

Pumpkin Cobbler


Magic Pumpkin Buckle Recipe

(picture from Taste of Home magazine)

Ingredients

  • 1/2 cup butter, melted
  • 1 cup all-purpose flour
  • 1 cup sugar
  • 4 teaspoons baking powder
  • 1/2 teaspoon salt
  • 1 cup milk
  • 1 teaspoon vanilla extract
  • FILLING:
  • 3 cups canned pumpkin
  • 1 cup evaporated milk
  • 2 eggs
  • 1 cup sugar
  • 1/2 cup packed brown sugar
  • 1 tablespoon all-purpose flour
  • 1 teaspoon ground cinnamon
  • 1/2 teaspoon salt
  • 1/4 teaspoon each ground ginger, cloves and nutmeg
  • TOPPING:
  • 1 tablespoon butter
  • 2 tablespoons sugar

Directions


  • Pour butter into a 13-in. x 9-in. baking dish; set aside. In a large bowl, combine the flour, sugar, baking powder and salt. Stir in milk and vanilla until smooth. Pour into prepared pan.
  • In a large bowl, beat the pumpkin, milk and eggs. Combine the remaining filling ingredients; add to pumpkin mixture. Pour over crust mixture (do not stir). Dot with butter and sprinkle with sugar.
  • Bake at 350° for 55-60 minutes or until a knife inserted near the center comes out clean and the top is golden brown. Yield: 12 servings

Monday, June 20, 2011

Cheeseburger Pizza ~ Kid-friendly Recipes ~ Fun in the Summer Sun Link-Up

Welcome to the 2nd week of our Fun in the Summer Fun event!  Each Monday until September 7th,  Mama to 4 Blessings along with:

Adventures of Mommydom,
Sweet Diva,
 Harvest Moon By Hand,
and Sweet Phenomena

 will be hosting Fun in the Summer Fun link up events.
Here's the line up:
The 1st Monday of each month: link up your "Kid friendly summer activities"
The 2nd Monday of each month: link up your "Kid friendly summer crafts"
The 3rd Monday of each month: link up your "Kid friendly summer recipes"
The 4th Monday of each month: link up your "How to stay cool in the summer heat"

Cheeseburger Pizza:
Sausage Cheeseburger Pizza (Cooking for Kids - Southern Living at Home Ckbk)
*made this way, it tastes much like a Krystal

1 lb. Bob Evans Original Recipe Roll Sausage (or lean ground beef or turkey)
1 (12 inch) prepared pizza shell
1/2 cup yellow mustard
2 cups (8 oz.) shredded mozzarella cheese
1/2 cup chopped onion
15 dill pickle slices
3/4 cup (3oz.) shredded cheddar cheese

Preheat oven to 425. Crumble and cook sausage in medium skillet until browned; drain well on paper towels. Place pizza shell on lightly greased 12" pizza pan on baking sheet. Spread mustard over shell; top with mozzarella cheese, sausage and onion. Place pickle slices evely on top; sprinkle with cheddar cheese. Bake 12 min. or until crust is cooked through and cheese is bubbly. Cut into thin wedges and serve hot. Refrigerate leftovers.

Makes about 8 servings.

Altered Version(pictured)

I ususally don't use the mozzarella when making it this way and use 8 oz. of cheddar cheese instead. Follow above instructions, using your choice of meat. I chop 1/2 cup onion and cook it with the meat because the kids like it better when the onions are softer - I like it either way. On top of crust (we usually make our own instead of the prepared), spread a layer of ketchup (maybe 1/3- 1/2 cup); I have put it on the pizza sometimes, and other times have served ketchup on the side - the family likes it either way and I haven't decided yet which way I like it best, then a layer of mustard. Add cooked meat, pickles, about 1/2 - 3/4 cup chopped fresh spinach and approx. one tomato, thinly sliced. Top with shredded cheddar cheese. Bake as directed above.

Pizza Dough:
Just in case you want to try making your own, too!  Makes enough for 2 pizzas; we double the above recipe because 1 pizza isn't enough for our family. ; )

1/2 Tbsp. dry yeast
1/8 c. warm water
1 1/4 cup milk
1/4 cup sugar
3/4 tsp. salt
Approx. 5 1/2 cups flour
1 egg, slightly beaten
1/4 cup oil

Dissolve yeast in warm water.  Heat milk to warm (110-115 degrees).  Add sugar, salt, and yeast to milk.  Gradually mix in 2 cups flour.  Add beaten egg and oil.  Mix well, then add remaining flour, until you have a soft dough, kneading well.  Cover with a damp cloth and let rise until doubled.  Punch dough down and let rest for 10 min.  Divide in half and spread each half on a greased and floured 12 in. pizza pan.  Add favorite toppings.  Bake at 400* for 15 minutes; add shredded cheese and bake 5 min more until cheese melts.

Confession:  this was on our menu for last week, but these photos are about 2 yrs. old.  We had a crazy busy week and it got pushed to this week's menu instead.  Bad blogger ~ but look how cute my Ashlyn was! ; )  This is one of her favorite recipes!

rolling out homemade pizza dough:


browning the meat:
 

about to put it in the oven: 

 yummy =)


Photobucket

Thursday, May 5, 2011

Cinnamon Crackle Cookies


I got this recipe from Taste of Home, and the only think I've change is the flour ~ I often use freshly ground soft wheat or a combination of freshly ground oat groats & all-purpose flour. =)

The tantalizing aroma that fills your home when these are baking is reminiscent of the things of Fall, but I personally see no reason to limit our enjoyment due to the season. ; )

Above, you have a pic I snapped in a rush due to what seemed like an army of hands eager and impatient to snatch one {or two} up while they were still warm.  They beg for a cup of coffee and a few stolen moments in time on the back deck to relax and enjoy with them ~~ or, maybe that's just me! ; )

Cinnamon Crackle Cookies

photo from Taste of Home
Ingredients:

1/2 cup butter, softened
1/2 cup shortening
1 cup sugar
1/2 cup packed brown sugar
1 egg
1 teaspoon vanilla extract
1/2 teaspoon almond extract
2 1/2 cups all-purpose flour (or 3 to 3 1/4 cups freshly ground soft wheat; or, 1 cup freshly ground oat groats plus 1 1/2 cups all-purpose flour)
1 tablespoon ground cinnamon
2 teaspoons baking soda
2 teaspoons cream of tartar
2 teaspoons ground nutmeg
2 teaspoons grated orange peel
1 teaspoon grated lemon peel
1/2 teaspoon salt
Additional sugar

 Directions:

In a mixing bowl, cream butter, shortening and sugars. Add egg and extracts; mix well. Combine the next eight ingredients; gradually add to the creamed mixture. Shape into 1-in. balls; roll in sugar. Place 2 in. apart on ungreased baking sheets. Bake at 350 degrees F for 10-15 minutes or until lightly browned.

Friday, March 4, 2011

Apple-Cranberry Wheat Muffins

Posting one of our favorite muffin recipes today ~ as far as my kids are concerned.....any day that begins with warm, homeade muffins is a good day indeed!  As always.....my fresh whole grain substitutions, as well as any others, are in parenthesis.

Busy mom tip:  sometimes I'll double the recipe and bake in two loaf pans instead, adjusting the time as necessary.  This saves me time in more ways than one:  loaf pans are easier and quicker to clean, and I can freeze the extra loaf for another time. =)

When I bake it in the loaf pan, my crew also enjoys it warm with cream cheese (Neufchatel - 30% less fat) if we have it!

Apple-Cranberry Wheat Muffins

photo courtesy of Luv2Bake @ food.com

Ingredients :


1 1/4 cups all-purpose flour
1/2 cup whole wheat flour
(or omit the 1st two ingredients and use 3 1/3 cups freshly ground soft wheat or a combo of ground soft wheat and ground oat groats)
1/2 cup granulated sugar
1/4 cup toasted wheat germ
2 teaspoons baking powder
1 teaspoon ground cinnamon
2/3 cup carnation fat-free evaporated milk { 5 ounce can} - (or low fat milk if you don't have evap.)
1/3 cup 100% apple juice, Premium
1/4 cup vegetable oil  (or 1/4 cup unsweetened applesauce)
1 large eggs
1 1/4 cups baking apples
3/4 cup dried sweetened cranberries (OCEAN SPRAY CRAISINS)
1 tablespoon cinnamon sugar

Directions:

Preheat oven to 400º F.

Grease or paper-line 12 muffin cups.

Combine all-purpose flour, whole-wheat flour, granulated sugar, wheat germ, baking powder and cinnamon in medium bowl.

Beat evaporated milk, apple juice, vegetable oil and egg in small bowl until blended.

Add to flour mixture; stir just until moistened.

Fold in apple and cranberries.

Spoon batter into prepared muffin cups, filling 3/4 full.

Sprinkle with cinnamon-sugar.

Bake for 14 to 16 minutes or until wooden pick inserted in center comes out clean.

Cool in pan on wire rack for 2 minutes.

Remove to wire rack to cool slightly.

Serve warm.
Photobucket

Friday, January 28, 2011

Flax Oatmeal Cookies

Posting this recipe today in honor of my references to oatmeal and flax in earlier posts this week. I thought I might as well have a theme going....and, in that spirit, I chose the most wholesome one in my collection! ; ) 
I got the original recipe from Breadbeckers - the co-op where I order my wheat and bread baking supplies from, and have added my changes/suggestions/addtions.
Posting for any fellow wheat grinders out there! :) **NOTE**Flour amounts will not be the same if using store-bought all-purpose or wheat flour. Use 1/2 cup less flour for every 2 cups if you'd like to make these with all-purpose.


Flax Oatmeal Cookies


Ingredients:

1 cup butter (I sometimes replace 1/2 cup of the butter with 1/2 cup creamy peanut butter for a healthier-fat/more protein alternative)
1 cup sucanat with honey (or 1 cup granulated sugar)
1 cup molasses sucanat (or 1 cup sucanat or brown sugar)
2 eggs
1 teaspoon vanilla
2 cups freshly ground hard white wheat flour (I often use soft white wheat)
1 cup oatmeal
1/2 cup flax seeds, Milled
1 teaspoon baking soda
1 teaspoon baking powder
1/2 teaspoon salt
1 1/2 cups almonds, chopped
2 cups chocolate chips (optional)
1/4 tsp. cinnamon (optional)

Directions:

Cream butter, Sucanat, and Sucanat w/Honey making a grainy paste.

Add eggs and vanilla and beat well.

Mix dry ingredients and stir into creamed mixture.

Add almonds and Chocolate chips.

Make into 1" balls and place on ungreased cookie sheet 2" apart.

Bake at 350 degrees for 10 - 12 minutes.

Makes about 5 dozen cookies.

**Optional Chocolate Chip Variation w/out Oatmeal:

Use 3 ½ cups fresh Soft White Wheat Flour.

Omit Oatmeal.
Use 1 ½ cups of Shredded Unsweetened Coconut in place of chopped almonds.

Use 2 cups of Chocolate Chips (or more).

Mix as directed in above recipe. 


Thursday, January 27, 2011

Plans Interrupted......and a "Stylish Blog Award" ; )

Linking up once again with The Homeschool Village for their January Thursday theme of linking up and posting our weekly homeschooling accomplishments......although this week, I feel we didn't accomplish very much!

Last Thursday, we had our bi-monthly meeting at 4H and Jacob gave his very first devotion as Chaplain.  He learned how quickly you forget what you want to say when all eyes are upon you and I suspect that next week, he'll have notes in hand ~ just in case! ; )  I still think he did a fabulous job & pray he always desire to be a leader for Christ.

Friday is Co-op Day, and then the weekend hit.....bringing with it coughs, sneezing and high fevers that interrupted the plans we had for this week.  I have to admit, although I truly hate it when my kids are sick, it's been kind of nice to be stranded at home for several days.  Some schooling got put on hold, but Mom has accomplished a lot!  Several stacks and piles of things that accumulated here and there and never got put away due to the hustle and bustle of life got sorted and organized ~ meaning no more piles and stacks stressing me out by their presence!

My home is more organized than it has been in months and cleaner as well.  While deep cleaning my kitchen to the point that an Amish woman would be impressed, I found a cleaning chart taped to the inside of one of my cabinet doors.  I made it years ago when my children were too young to be really helpful in the whole cleaning process, taped it to the cabinet door and eventually as life got busier and busier with each passing year.....I stopped following my schedule.  It was replaced by a rather random clean-it-when-I-have-time-or-it-looks-like-it-needs-it routine that doesn't actually work very well and stresses me out!  Now, with 3 more-than-able-bodied helpers, the cleaning schedule is back full force.  Now someone can stop by my house unannounced without that dreaded feeling of, "Oh no....the house is a mess!" (although that doesn't mean it will always be nice and orderly due to these people that live with me and leave their belongings scattered all over the place!).

Like I said, it's been there for years and I need to print a new one.....thought we'd follow this schedule for a couple of weeks to see if I need to adjust it before I replace it.

We did get a lot of academics in, much of which looked a lot like last week, but due to being sick it was mostly do-only-what-we-have-to-do and nothing more.

Also, since I believe that tons of learning takes place outside of "school books"......

The day I made banana bread, I ground some flax seed to use as a healthy egg substitute which (as always) brought The One With The Inquiring Mind (aka: Robert) to the kitchen.

Flax seed, pre-ground....
 ....and post-ground:
You're not supposed to grind flax in a wheat grinder (too oily), I grind mine in a coffee grinder.  I usually grind more than I need and store it in the freezer for quick additions (makes a great thickener for fruit smoothies) and substitutions.

Whole grain banana bread with flax substitute for some of the eggs.  I do this quite often and it works wonderfully!

Flax Egg Substitute:
For each egg you want to substitute, use...

1 Tbsp. ground flax seed
3 Tbsp. water

Combine and let sit for 5-10 min, until water is absorbed.  Then, add to recipe as a substitute for eggs.

Although they've seen me do this countless times, on this day it peaked their interest and ended up being a lesson in itself, prompting opening the same book as last week to see why I go to the trouble.  Jacob, with a fever topping out at close to 104 on this day, suddenly found this book quite intriguing.....


....and because I don't think watching lots of movies {a couple were fairly educational ; ) } and laying around lethargically while our world was drowning in tissues, thermometers, essential oils, herbal teas, soup and jello qualifies as accomplishments, I think my "homeschooling" list is done.

I also received a lovely little award this week from Brenda at Therapeutic Crafting!


I love the way it color coordinates with my blog ; )  ......and, since I always follow the rules.....
To accept this Award you must:

1. Thank and link back to the person who awarded you this award.

2. Share 7 things about yourself.  (below)

3. Award 15 recently discovered great bloggers.

4. Contact these bloggers and tell them about the award!


1.  I almost drowned when I was two-ish. I can remember very distinctly watching the bottom of the pool get closer and closer and watching the drain get bigger and bigger the closer I got. I don't remember being scared.  My sister saved me, although sometimes I'm sure she regrets it ; )

2.  I like the beach but am afraid to swim in the ocean. There are creatures in there that I can't see.

3.  I hate to cry in front of people!  I am not a person who "wears her heart on her sleeve" and prefer to shed my tears in private.

4.  I have never in my life told my "testimony" or life story, but I love to hear others' stories. I find it fascinating to hear what the Lord had done in people's lives, how events and circumstances have shaped them into who they are, etc. To me, that's what a testimony is....not just someone telling when they got saved. If I know that telling your life story is expected before I go to an event, I usually won't go because I will get emotional and cry (see number 3).

5.  I can write about things that I can't talk about.  ???

6.  I flat-out refused to blog when everyone jumped on the blogging band-wagon.  I have friends who have been urging me to blog for years and I wouldn't consider it.  And yet, finally, here I am. 

7.  I have a very real need to laugh every single day.  I am always trying to teach my children that life is so much more fun when you can laugh at yourself and the stupid things you sometimes do. God is good and faithful - He is constantly providing them with first-hand examples of how someone should do that through the ridiculous blunders their mother continually makes. : )

I actually hate talking about myself and I'm glad it was only seven things!
Thursday, January 20, 2011

Peter, Peter, Pumpkin Eater

Okay......so no one in this house is actually named Peter, and this nursery rhyme has actually nothing to do with this post.  BUT, the activity we did this week that my kids most enjoyed DID involve pumpkin......and every time we do this activity (usually in the fall), I think of this rhyme.  Because I am WEIRD.  And I homeschool, so I'm entitled to be weird.  Most homeschoolers are, you know.  ; )

Linking up with the Homeschool Village to share our schooling accomplishments and activities for the week.

Math:  We multiplied, divided, reduced fractions, added, subtracted, multiplied, and divided fractions, worked with measurements, labeled geometric shapes, and did word problems.  I have to add that in doing some word problems with my 7th grader, I had to teach her the most round-a-bout, confusing method of solving them that I have ever encountered (Saxon 8/7)!  I didn't say much about it as I was teaching it ~ just kept plowing ahead, keeping most of  thoughts to myself  (aside from a "Hmmmm, I don't remember doing it this way when I was in school" because it's what the book said to do.  Finally, towards the end of the lesson, my exasperated daughter says in her exasperated voice, "This is confusing!  What's the point?!" to which I started laughing and said in MY exasperated voice, "I have no idea!  It confuses me, too!".  She wanted to know why she couldn't do it the way I do it because it makes more sense to her.  If you've encountered this with your curriculum, please tell me the answer to this dilemma because it's not the first time we've encountered this issue.

Spelling:  Yep, we did it!  I've found that my boys are often done with their schoolwork much earlier than my daughter, so in Spelling I often let them read each others lists, dictation, etc. to one another.  It gives them extra reading and spelling practice that they don't realize they're getting, and keeps them busy for a little bit longer while I help Ashlyn with more difficult things (see above).

Language Arts:  We diagrammed sentences, practiced our punctuation and capitalization, worked with subject/verb agreement, compound subjects and compound verbs.....sometimes with the company of The Very Bad Cat, who has a way of making the mundane a little more bearable. ; )

Jacob made the bed, covering it with his favorite blankets.  At this point, I take all the help I can get and try not to complain about the results. ; )

We completed all our work for co-op in Science, History and Writing as well. Last week, I mentioned that I had to help with a Turtle project.  Robert had to do research and make a display board on Australian FlatbackTurtles, as well as make a model out of clay:


The finished board:

 He had some help from his cousin on the clay turtle:

And, what about the pumpkin?

This lovely little pumpkin has been sitting  decorated my kitchen since the week of Halloween when I bought it, intending to carve it.....and never did because I am a Very Bad Mom.

I finally found the time to gut the gourd-like squash (yes ~ it was still good!  Perfect, actually....these babies last for a LONG time!)  This kind of thing is right up 2 of my student's alleys and they were quite eager to help (esp. my little chef on the left).


This led to much discussion on what nutrients the pumpkin and its seeds give us, how much pumpkin we could get out of this one compared to what comes in a can, and the benefits of composting the guts as well as the shell after it was done roasting (we wasted not one bit!)

Approx. 12 cups of pumpkin

After we washed the gunk off our hands, Robert grabbed this book off the shelf:


It has a huge listing of everyday foods, herbs and spices and provides tips on how to select the best,  how to store and best use them., nutritional info on each one, health tips on what ailments they are best for and treatments suggestions, as well as recipes.  They find it fascinating to look up foods we may be enjoying and see how God provided for our needs through them. (They don't do this all the time.....the curiosity hits them randomly.)

They were also rewarded for their efforts with a pumpkin dessert after dinner that night.  : )  Since I'm feeling the urge to be extra sweet this week, I'll share the recipe with you ~ and it's not even Friday (the day I usually post a recipe)!  It's one of their favorite pumpkin desserts....tastes like pumpkin pie, but easier to make because you don't have to make a pie crust (I'm not a fan of the store-bought variety) and goes further than one pie does, too. One pie around here is good for about one evening......this dessert is good for two.  : )


Magic Pumpkin Buckle:

INGREDIENTS:

1/2 cup butter, melted
1 cup all-purpose flour
1 cup sugar
4 teaspoons baking powder
1/2 teaspoon salt
1 cup milk
1 teaspoon vanilla extract

FILLING:

3 cups canned pumpkin
1 cup evaporated milk
2 eggs
1 cup sugar
1/2 cup packed brown sugar
1 tablespoon all-purpose flour
1 teaspoon ground cinnamon
1/2 teaspoon salt
1/4 teaspoon each ground ginger, cloves and nutmeg
TOPPING:

1 tablespoon butter
2 tablespoons sugar

Directions:

Pour butter into a 13-in. x 9-in. baking dish; set aside. In a large bowl, combine the flour, sugar, baking powder and salt. Stir in milk and vanilla until smooth. Pour into prepared pan.

In a large bowl, beat the pumpkin, milk and eggs. Combine the remaining filling ingredients; add to pumpkin mixture. Pour over crust mixture (do not stir). Dot with butter and sprinkle with sugar.

Bake at 350° for 55-60 minutes or until a knife inserted near the center comes out clean and the top is golden brown. Yield: 12 servings.


Photobucket

Friday, November 5, 2010

Garlic Cheese Biscuits

Posting two recipes this week since I didn't post any last week....plus, I always serve these biscuits with Lemon Pepper Shrimp Linguine ~ it just wouldn't be right to post one and not the other!  : ) 

My family ♥loves♥loves♥loves♥.....did I mention ♥LOVES♥ these tender, buttery, cheesy & garlicy gems of delight!  To be honest. we love any biscuits......buttermilk with honey, buttermilk with jam, cinnamon raisin.... if it's a biscuit, we love 'em!  It's a good thing, too, because I'm fairly certain it would be against the law to be ♥Southern♥ and not love biscuits. ; )

My kids think it's a special occasion when I make these.....if you're familiar with Red Lobster and their *amazing* Cheddar Bay Biscuits, these taste nearly ~ if not completley ~ identical to thiers.


Ingredients:


2 cups all-purpose flour

3 teaspoons garlic powder, divided

2 1/2 teaspoons baking powder

1/2 teaspoon baking soda

1/2 teaspoon chicken bouillon granules

1/2 cup butter flavor shortening

3/4 cup cheddar cheese, shredded

1 cup buttermilk
(Don't have buttermilk?  Put 1 Tbsp. white vinegar into a measuring cup and fill it up the rest of the way with milk to measure 1 cup...works like a charm for baking!)

3 tablespoons butter, melted
 
Directions:
 
In a small bowl, combine the flour, 2 teaspoons garlic powder, baking powder, baking soda
and 1/2 teaspoon bouillon; cut in shortening until mixture resembles coarse crumbs.
 
Add cheese. Stir in buttermilk just until moistened. Drop by heaping tablespoonfuls
1 inches apart onto a greased baking sheet.

Bake at 450 for 10 minutes.

Combine butter with remaining garlic powder; brush over biscuits.

 Bake 4 minutes longer or until golden brown.

Serve warm and try not to eat them all yourself! 
I know sharing is hard sometimes, but it IS the right thing to do! ; )

Yield: about 1 dozen.


Blog Hopping today with:

BoostMyBlogFridayFriendly Friday Button


Smart and Trendy MomsThe Girl Creative

Photobucket